A Blog by the Editor of The Middle East Journal

Putting Middle Eastern Events in Cultural and Historical Context

Showing posts with label First World War. Show all posts

Monday, December 11, 2017

December 11, 1917: Allenby Enters Jeusalem

Allenby enters the Jaffa Gate
After the British occupied Jaffa in November, 1917, General Allenby set his sights on the hill country around Jerusalem. On December 11, two weeks before Christmas, Allenby walked through the Jaffa Gate of the Old City ahead of his troops. (The cavalryman entered on foot because when Kaiser Wilhelm II had visited the city, he rode a white horse, leading to comments that "a better man than he rode a donkey."

Allenby did not take Jerusalem by a direct assault. He sent several columns of British and Empire troops to advance to the north of Jerusalem, to cut the road to Nablus and cut the Turkish line of retreat; another column advanced from Hebron toward Bethlehem from the south. On ditionNovember 24 the 75th Division took Nabi Samwil, the traditional tomb of the Prophet Samuel which dominated the Jerusalem northern horizon.

There was a pause in the advance, but on December 8 the southern column reached the outskirts of Bethlehem. That night the last Ottoman troops left the city. On the morning of the ninth, the Mayor of Jerusalem, Hussein Salim al-Husseini of the well-known Husseini family, set out under a white flag with a letter from the Ottoman commander, planning to surrender the city.
Mayor Husseini and the Surrender Delegarion

He encountered two sergeants of the London Regiment, James Sedgewick and Frederick Hurcomb. Essentially feeling this was above their pay grade, the sergeants declined the surrender, but Husseini was eventually passed up the chain of command until finding an officer to accept the surrender.

Allenby was instructed to keep the surrender a secret until Parliament could be notified, and though he wrote his wife on both the ninth and tenth, he did not mention the surrender until the 11th, the day he entered the city.

Jerusalem, as noted in an earlier post, was not a military objective (the Ottoman Seventh Army had moved to Nablus), but it was a powerful religious symbol to the three religions that consider it holy. The Ottomans did try a counterattack later in December, but by the new year the front had stabilized with both Jerusalem and Jaffa securely in British hands.

Some video (Hebrew captions but the first is an Imperial War Museum video) of the entry:


Wednesday, November 29, 2017

November 1917: Allenby Moves North, Part I

After General Allenby's forces took Beersheba on October 31, 1917, the early days of November were spent occupying Ottoman lines between Beersheba and the coast at Gaza. It took only about another month for Allenby to take Jerusalem.

That was no easy task. Before the construction of the modern road from Tel Aviv to Jerusalem and other major routes in the modern Israeli road system, the roads approaching Jerusalem were poor, mostly unpaved, and winding through the rough Judaean hill country. As the Ottoman Seventh and Eighth Armies withdrew from the desert around Gaza and Beersheba into the coastal plain and adjacent hill country, it became increasingly difficult to maintain communications between them, leaving the Eight Army in the coastal plain and the Seventh in the hill country unable to cooordinate operations.

Things were no easier for Allenby. The rail line and water pipeline from Egypt ran to Deir al-Balah south of Gaza; from the railhead (nicknamed "Dear Old Bella" by the troops) Allenby had to arrange transport for food and water and other supplies to the advancing troops, and these included the Desert Mounted Corps, this had to include supplies for their mounts as well. Given the lack of deepwater ports, despite the Royal Navy's control of the sea, supplies had to be landed by small boats.

There is an old military axiom that "amateurs talk about strategy; professionals talk about logistics." Though Allenby was a master of tactics, his organizational logistical work in the Palestine campaign was crucial.

Allenby's aide and first biographer General Archibald Wavell (later Field Marshal Lord Wavell), who was a skilled military historian as well as a field commander, noted that Allenby relied on two books during the Palestine Campaign: the Bible and Sir George Adam Smith's Historical Geography of the Holy Land. Smith's book, first published in 1894 and still valuable to anyone interested in the impact of geography on Israel/Palestine/Jordan (I'll do a separate post about the book soon), places great (though not exaggerated) emphasis on the natural defenses of the Judaean hill country, while recognizing it has frequently been conquered. If he read Smith carefully, Allenby would have understood the challenges ahead of him.

Once embarked on the Palestine campaign, there  was really only one realistic objective: Jerusalem. It was not a major military objective: the Ottoman Seventh Army was already moving its headquarters to Nablus. But while Allenby may have carried a Bible, the Prime Minister for the past year, David Lloyd George, fancied himself something of a Bible scholar. And clearly everyone in Europe (and America, now in the war, though not with Turkey) would pay attention if the British took the Holy City. (Baghdad was a more important military objective than Jerusalem, in terms of importance ro rhe Ottomans but how often do you see photos of Gen. Maude's entry into Baghdad compared to those of Allenby entering Jerusalem?)

On the left, Allenby's forces fought a battle at Ayun Kara (also known as Mughar Ridge) on November 14, forcing the withdrawal of the Ottoman Eighth Army from Jaffa. The British occupied Jaffa November 6, but this did not free up Jaffa for use as a port by the British. The Turkish Eighth Army had only withdrawn behind the al-‘Auja River (today usually known by the Hebrew name, ha-Yarkon), which left the port of Jaffa within range of the Ottoman artillery behind the ‘Auja. (Today, Jaffa, the Yarkon, and everything in between are part of the modern Municipality of Tel Aviv-Yafo; Tel Aviv, founded in 1909, was still tiny in 1917.)

In Part 2, which will appear in early December, we will look at Allenby's advance into the hill country.


Thursday, November 2, 2017

Balfour After a Century

A century ago:


Many commentators have already analyzed the Balfour Declaration before its centennial, and there is little point in repeating their observations here. Let me make just a few points:

As I noted just two days ago, the occupation of Beersheba by Allenby on October 31,1917, was the first real British foothold inside Ottoman Palestine (unless we count the occupation of Aqaba by the Arab Revolt). Beersheba was seen as the Biblical southern boundary of Ancient Israel (from Dan to Beersheba), and two days after Britain acquired a tenuous hold there, the British Foreign Secretary made a commitment, ambiguous and hedged with conditions as it is, to the future of Palestine, then still under Ottoman control.

Now, under the Sykes-Picot agreement France and Britain had envisioned an international regime for part of Palestine including Jerusalem. But Sykes-Picot was a secret agreement, unknown to Lord Rothschild or Chaim Weizmann on November 2. (But not for long: on November 23, the new Bolshevik regime in Russia published the text in Pravda and Izvestia.) And then of course there was the Hussein-McMahon correspondence which promised Sharif Hussein territories argued about ever since.

Generations have noted that the "Promised Land" was promised to several different parties, even though Britain did not even control the territory in question. But 1917 was still an age of imperialism, and the idea that Great Powers could decide the fate of "lesser" countries. (Bonus question: Has this really changed that much?)

Israelis today are more likely to point to the League of Nations Palestine Mandate and/or the 1947 UN Partition Resolution as the legal basis for the state, since these had international legitimacy, and were not simply the diktat of a single Great Power.

To save space, I will avoid the question of what a "national home" meant or how it could be created without prejudicing the rights of "the non-Jewish communties of Palestine."

Arthur James Balfour had served as Prime Minister and First Lord of the Admiralty before becoming Foreign Secretary. But despite his long political career, his name will forever be attached to a single, run-on 67-word sentence sent a century ago today.

Tuesday, October 31, 2017

October 31, 1917: The Light Horse Charge at Beersheba

George Lambert, The Charge of the Australian Light Horse at Beersheba, 1917
When we last discussed the centenary of the Palestine campaign last June, the Egyptian Expeditionary Force (EEF) was stalled after te First and Second Battles of Gaza, with the Ottomans secure behind strong fortifications along a line running from Gazainland to Beersheba at the edge of the Negev. Archibald Murray had been relieved and a new general, Edmund Allenby, dispatched to take over the campaign.

Over the summer, Allenby moved his headquarters from Cairo to the front, received only limited reinforcement, but was ordered to advance with the forces he had.

The Ottomans had reinforced their defenses, but Minister of War Enver Pasha wanted to move to retake Baghdad from the British, and so assembled a joint Turkish-German force near Aleppo intended to move into Mesopotamia under German command, known as the Yıldırım Force. Enver's generals objected, both to being put under German command and to leaving the Palestine defenses undermanned in order to concentrate on retaking Baghdad when there were threats on other fronts.

The British operated best along the coast, where they could depend on the guns of the Royal Navy, but Murray having twice failed to break the line at Gaza, Allenby resolved to try something different. As I've noted in earlier posts, the British had slowly extended the railroad and a pipeline carrying fresh water across Sinai to the borders of Palestine. But to operate inland beyond the end of the pipeline required a source of water for the troops, and for the horses of the Desert Mounted Corps.

Allenby's first biographer, Archibald Wavell (who would himself command in Egypt in a later war), wrote that Allenby carried with him two books, the Bible and Sir George Adam Smith's Historical Geography of the Holy Land, a wonderful Victorian description of the historical landscape of Palestine. He would, then, understand the importance of finding water once he abandoned the coast road.

Gaza to Beersheba
The Ottoman lines were solidly fortified from the coast at Gaza to Hareira (modern Tel Haror in Israel), and beyond that lay the Ottoman garrison at Beersheba (Beer-Sheva) on the edge of the Negev. And, as Allenby would have known from George Adam Smith, that ancient town's Hebrew name means "Seven Wells." Allenby decided to take Beersheba by surprise with a fast-moving column and seize its wells; then, with water available, he would roll up the Turkish line along the 43 kilometers from Beersheba to Gaza.

Every effort was made to persuade the Turks that the main attack would be along the coast. Beginning october 27, field artillery and naval guns bombarded the Turkish lines at Gaza, and the main force of British and Empire forces, centered on XXI Corps, remained in front of Gaza. Meanwhile the British XX Corps and the largely Australian Desert Mounted Corps were moved quietly and by night far to the right. Allenby's center was weak and potentially vulnerable to Turkish attack, but Allenby gambled that the Turks would remain secure in their defenses.

Beersheba in 1917
Both Allenby himself and the new German overall commander of the Yıldırım Force, Erich von Falkenhayn, were veterans of the stalemated trench warfare on the Western Front (which at this moment was undergoing the bloodletting of Passchendaele), and Allenby had served with the cavalry in the Boer War, and so appreciated the importance of mobility on the battlefield. Though tanks had been used at Second Gaza, mobility at this time still meant horses, and at Beersheba that meant the Australian Light Horse and the New Zealand Mounted Rifle Brigade.

Sir Harry Chauvel
On October 31, the infantry force approached Beersheba from the West while the mounted troops concentrated against an Ottoman outpost at Tel el Saba east of Beersheba. Once Tel el Saba was taken, the Ottomans  began withdrawing from Beersheba, unknown to the British.

After a long day of fighting, Allenby urged Sir Harry Chauvel, commander of the Desert Mounted Corps, to take Beersheba by nightfall. This produced one of history's famous cavalry charges, by the 4th and 12th Light Horse. It was the 12th that actually occupied the center of Beersheba, but the 4th got most of the credit.

The Charge
Sometimes called the last great cavalry charge, there would actually be many more in this war and later ones; cavalry charges have occurred in Afghanistan in recent times. But Beersheba became an iconic moment for the Light Horse and thus a key moment or Australian national identity; the Prime Minister and other Australian dignitaries were in Israel today for the centennial observations.

Harry Chauvel had one knighthood already; he won another (Knight Commander of the Bath) for Beersheba. At a moment when the Western Front was being bled dry at Passchendaele, Allenby had struck the first blow in a campaign that would have him in Jerusalem before Christmas.


Monday, May 15, 2017

Origins of the ‘Aqaba Campaign, Part II


Newcombe
It has now been almost a week since my first post on the origins of the ‘Aqaba expedition in 1917.

After the occupation of the Red Sea coast port of Wejh by the Royal Navy and the Arab Revolt in January 1917, the gradual advance up the Red Sea Coast had been put on pause, while the main British force out of Egypt advanced across Sinai, extending both the railway and a freshwater pipeline as it moved. In the meantime the Arab Revolt troops, advised by British advisors Stewart Newcombe, P.F.Joyce, and a diminutive young intelligence officer from Cairo named T.E. Lawrence, had begun a series of raids against the Hejaz Railway, the main Ottoman supply link to its garrison in the holy city of Medina.

But David Lloyd George was impatient to speed up their advance into Palestine; and after the Second Battles of Gaza, between May and July 1917, the Arab Bedouin forces under Prince Faisal ibn al-Hussein would embark on a campaign which would capture the imagination of the world, even if its military significance was limited. This was the capture of the last Ottoman seaport town on the Red Sea, ‘Aqaba, at the southernmost tip of Palestine (Jordan today). ‘Aqaba was a small village — it would take multiple wars in Iraq to turn it into the giant shipping center it is today — Jordan's only seaport.

The idea of taking ‘Aqaba was self-evident. It would complete the Royal Navy's control of the Red Sea, allow closer supply by sea to the Arab Revolt, and cover the rear right flank of General Murray's (soon to be General Allenby's) campaign.  But who would take it?

The idea found an early advocate in France's military advisor to the Arab Revolt, Édouard Brémond, proposed landing French troops from British ships. Reginald Wingate in Egypt liked the idea, but Murray was fiercely opposed, saying it was premature. Sykes-Picot was already in existence, but the British, suspicious of French motives, wanted to protect their options in ‘Aqaba, which they considered a potential forward defense for the Suez Canal. They and their Arab allies also suspected France wanted to use ‘Aqaba as a means of blocking the Arab Revolt from expanding into Syria, where France had colonial ambitions.

So conflicting colonialisms were blocking a decision to take ‘Aqaba, though there was little military impediment to doing so. 

Prince Faisal also had ambitions toward ‘Aqaba. But he was suspicious of British and French intentions (justly so), while they did not want the Arab Revolt in‘Aqaba without them.

Late in 2017 British ships had put a landing party ashore at ‘Aqaba, and taken some prisoners, but they continued to resist occupation.

Meanwhile, Newcombe had devised a new strategy in lieu of occupying ‘Aqaba. The Bedouin Arab Army, working with Egyptian troops, would occupy a position along the Hejaz railway, near the Nabatean ruins at Mada'in Salih in what is now northwestern Saudi Arabia. Here, they could blockthe railway and cut Medina off from Syria, leaving it to be picked off.

Lawrence at Wejh, 1917
T.E. Lawrence opposed the idea. A short, physically unimpressive captain in military intelligence, he had met Faisal late in 1916 and Faisal had become depend on him for military advice.

Lawrence is surrounded by much mythology (for which he is partly but not exclusively responsible), but he was undeniably an innovative military thinker. He sought to apply military theory to traditional desert warfare. As a student hr had closely studied Crusader castles, and as an archaeologist/covert intelligence officer he had familiarized himself with many of the sites, including ‘Aqaba, where he would campaign.

Lawrence was convinced the Mada'in Salih campaign was misguided. The tribes and the Egyptians would not work well together; the force would be open to Turkish attacks from all four directions; and Lawrence was opposed to taking Medina outright, preferring to leave it in Turkish hands and bleed them through attrition, attacking and reducing their rail supply line without cutting it entirely. The Ottomans would not voluntarily give up the second holiest city in Islam, and it would cost little to keep them tied down.

But Lawrence could still not sell an ‘Aqaba alternative. On March 8 Gilbert Clayton, the intelligence chief in Cairo, explicitly ordered Lawrence and others that a move by Faisal on ‘Aqaba "was not desirable at this time."

But there were some who had other ideas. That will be Part III.

Tuesday, May 9, 2017

May 9, 1917: Origins of the ‘Aqaba Campaign, Part I

A century ago today, on May 9, 1917, a small party of 45 Arab men and a single Englishman rode out of the Red Sea port of Wejh into the desert country to the north. The small raiding party was ostensibly going on a typical raiding expedition of the Arab Revolt. The overall Arab commander, Prince Faisal, knew where they were headed, but the Arab Army's British and French advisors did not. In fact, the one British officer accompanying them knew, but just two months before had been explicitly ordered against such a venture, an order not yet rescinded. The Englishman was T.E. Lawrence; the tactical commander of the raid was the most famous tribal warrior in northern Arabia and southern Syria, the Howeitat chieftain ‘Auda Abu Tayeh; and their goal was the last Red Sea port under Ottoman occupation, ‘Aqaba.

You've heard of ‘Aqaba, of course. Its capture is the centerpiece of the first half of David Lean's epic 1962 Lawrence of Arabia. As I've noted before, the film takes considerable liberties with historical fact and may be a better movie for it. Surely the six foot two inch Peter O'Toole is a more heroic cinematic presence than the five foot five inch Lawrence would have been, but the blond hair and blue eyes are right. And Anthony Quinn was no Arab and his real role is if anything shortchanged, but he's a memorable ‘Auda Abu Tayeh.

And I'm sure if you know anything about the fall of ‘Aqaba, it probably is derived from one of the great scenes in epic cinema, as the attackers charge down a long plain, ride through the Turkish guard post and the awakening camp, and then, with the theme song rising in the background, fan out through the village and ride down to the sea in triumph. it's a hell of a memorable scene. If you've never seen the movie (what's wrong with you?), here it is:

As cinema, it's magnificent. As history, not so much. Nothing remotely like the above actually took place. The actual battle took place many miles to the north at Abu al-Lissal, nowhere near the sea.. There were no fixed guns pointed out to sea that could not be turned (that was Singapore in 1942); in fact the Royal Navy routinely shelled ‘Aqaba and had even put a landing party ashore in late 1916 and taken prisoners, some of whom defected. And as shown, Lawrence was riding a camel and firing a pistol, but in reality he accidentally shot his mount in the head and was injured when it threw him.

The actual history is less cinematic, but worthy of telling. in Part II, I hope later today I'll begin the tale.

Wednesday, April 19, 2017

April 17-19, 1917: The Second Battle of Gaza, First Use of Tanks and Poison Gas in Middle East

Of eight Mark I tanks at 2nd Gaza, Turkish fire destroyed three
The past three days mark the 100th anniversary of the Second Battle of Gaza, part of the Palestine Campaign in World War I. In an ironic echo of the present, it also marked the first use of poison gas in the Middle East campaign, as well as the first use of tanks.

As we saw in discussing the First Battle of Gaza in March (Part I and Part II), the British command in effect snatched defeat from the jaws of victory by ordering a retreat, despite the fact that ANZAC Mounted troops were already in the midst of Gaza town. They feared the arrival of Turkish reinforcements and the fall of darkness.

The overall commanders, Egyptian Expeditionary Force commander General Sir Archibald Murray, and Eastern Force Commander General Sir Charles Dobell began preparing for another attempt. Both minimized the first loss in their reports and predicted a successful second attack. Both men in effect were putting their reputations on the line.

After the first battle, the Ottoman forces had be reinforced. There were now three regiments defending Gaza proper, with additional regiments at Hareira (now Tel Haror in Israel)nd others at other points along the road between Gaza and Beersheba. The Ottomans and their German allies had fortified a series of trenches interspersed with strong defensive redoubts and enfilading fire. New German aircraft had arrived, making the air war component more equal. Both sides had discovered the advantages of aircraft in open desert reconnaissance.

Meanwhile, the British had been reinforced with two weapons already in use on the Western Front: a supply of poison gas shells, in this case containing a 50/50 blend of phosgene and chlorine gas; and eight Mark I tanks. The Mark I was the British first generation tank introduced in 1915. Though history would prove desert to be excellent tank country in future wars, the gullies and arroyos around Gaza and the Turkish trenches made it hard to pass; and the Mark I had a maximum speed of only six kilometers per hour and a tendency to break down. Of the eight tanks, two were knocked out in the opening attack and a third later. And though the Turks had no gas masks, the gas attack, when launched, reportedly dissipated in the desert air without significant effect.

Dobell favored a direct frontal attack, accompanied by a swing to the right around the main Gaza lines by the Desert Column. Desert Column Commander Sir Philip Chetwode and ANZAC Commander Harry Chauvel expressed doubts, favoring an attack on the coastal flank of the Turkish lines.

On April 17 and 18, the advance began with the British infantry advancing from the Wadi Ghuzze to engage the forward Turkish outposts. Turkish resistance was fierce and after two days of fighting, they were at their desired position but had captured only outlying outposts.
The fighting on the 19th was complex and need not be described in tactical detail. Resistance was fierce and casualties mounted. British and Empire forces succeeded in penetrating the Ottoman lines in several places, but each time they were met with counterattack which drove them back. The next morning, British positions were bombed by German aircraft, and Turkish cavalry was massing near Hareira. It was decided to withdraw. Losses were high, and the defeat more decisive than in the first battle.

Aftermath


With its manpower depleted, the EEF campaign to take Jerusalem was put on hold. Murray decided to make the Canadian Dobell the scapegoat. He was relieved of command and packed off to India. Chetwode, a better and more experienced general, replaced him ans head of Eastern Force; and Harry Chauvel, the ANZAC Light Horseman, took over the Desert Column. In August it would be renamed the Desert Mounted Force, and Chauvel, one of the last great cavalry commanders, would lead it in a series of charges at Beersheba, Megiddo, and into Jerusalem, Damascus, and Aleppo. The Light Horse would win fame for Australian arms, and Chauvel would become Australia's first full General.

Murray (Seven Pillars)
But not under Murray's command. Murray has been a patron of the Arab revolt, a sponsor of T.E. Lawrence (the David Lean film does him an injustice), and a victor over the Senussi (Sanusi) and in the Sinai. But the two defeats at Gaza in two months, after his confident predictions, was too much and he was recalled and given command of the Army training center at Aldershot. He continued to recive promotions, but held no more field commands.

Though the military high command continued to believe that victory would be won on the hemorrhaging Western Front, the man who had become Prime Minister the previous December, David Lloyd George, was an enthusiast for the Eastern Front, and particularly for taking Jerusalem. The Bible-quoting Lloyd George favored naming a "dashing" sort of commander for the Palestine Front.

Allenby (Seven Pillars)
The search for a new commander was not smooth.  General Jan Smuts, Commander of the South African Army and a member of the Imperial War Council, refused the assignment. In June, a former cavalry commander and Boer War veteran (though in that war he was the opposite side from Smuts), but who had been enjoying a rapid rise on the Western Front until suffering a setback. Still a believer that the West was the real war, he first considered it a joke, but accepted. His name: Edmund Allenby.

Friday, March 31, 2017

The First Battle of Gaza, Part II: Snatching Defeat from Victory

It has been a week (because I was down with a bug and on deadline) since I published Part I on the First Battle of Gaza. If you haven't already read that post, I would urge you to do so today before reading this one.

The main events of the battle took place on March 26, 1916, with some final movements the next day so we're slightly past the 100th anniversary.

By the morning of the 26th, the British were deployed for attack. As noted in Part I, the British lines were extended along the coast as the rail and water lines advanced. This left their right flank hanging in the air and vulnerable to an attack from the Ottoman forces at Beersheba. To protect his flanks and secure his lines of communication General Sir Charles Dobell, Commander of the Eastern Force, kept significant forces around Rafa and elsewhere along the line. (For the dramatis personae, see Part I.)

The British plan of attack called for a frontal assault by infan try to seize Gaza before the Turkish garrison could withdraw, The frontal assault would be carried out by the 53rd (Welsh) Division  and one brigade from the 52nd (East Anglian) Division.Meanwhile the ANZAC Mounted Division and the Imperial Mounted Division would envelop the Turkish line and hold off any attempts to reinforce the garrison by Turkish troops from Beersheba or Jaffa. The Turkish defenders were already 4,000, while the British expected only 2,000.

The infantry attack met with stiff resistance; the Turks were well-dug in and the arid terrain provided open fields of fire. Adding to the British problems, a heavy fog set in before dawn, preventng visual reconnoitering of the Turkish lines.

The infantry attack, delayed by the fog and a generally slow start had as its initial objective the shrine of ‘Ali Muntar. But difficult communications between 53rd Division Commander Maj. Gen. A.G. Dallas and Desert Column Commander General Sir Philip Chetwode created much confusion, as did delays in bringing up the artillery and a failure to register the artillery on the Turkish lines.

bell and Chetwode sent Dallas his orders to launch his attack; orders were sent at 11, again at 11:30, and with increasing urgency at noon. Still without adequate artillery, Dallas finally attacked.n

The infantry assault did eventually make progress, reaching the Turkish defenses around ‘Ali Muntar.
They captured German and Austrian troops as  well as Ottoman.
Situation 2:00 PM
Meanwhile, Chetwode named Harry Chauvel of the ANZAC Mounted Division to command both it and the Imperial Mounted Division for the day. The Imperials were to patrol the approaches in the east to block reinforcements, while the ANZACs attacked Gaza from the north.

Dobell and Chetwode were increasingly worried, however, that Gaza would not be taken before dark due to the morning delays, and that the British right flank might be vulnerable to an attack in the darkness.

By 5:30 PM. the Infantry had finally taken ‘Ali Muntar, wile to the north, the ANZACs managed to actually enter the town of Gaza. By a bit after 6:00 PM. the British Empire forces seemed to be nearly victorious.
Situation 6;00 PM
Ottoman reinforcements had meanwhile arrived on the east in the afternoon, further raising concerns.

Sunset on March 26 was expected at 6:00 PM. Neither Dobell nor Chetwode yet knew that the infantry had taken ‘Ali Muntar.

At 6:10 PM, Chetwode, after consulting with Dobell, ordered the withdrawal of the mounted divisions. Even when he learned the British position was better than he realized, he did not change his position.

And thus, not for the first time, caution and bad intelligence managed to snatch defeat from the very jaws of victory.


Thursday, March 23, 2017

The First Battle of Gaza, 1917: Part I: Opening Moves

The next few days will see the 100th anniversary of the First Battle of Gaza, the opening clash of the Palestine Campaign in World War This will be a multi-part post.

We saw in January how the Sinai campaign ended with the Battle of Rafah and the retreat of the Ottomans behind their own frontier.

The advance across Sinai had been slow, as the British had to extend their railway line and a freshwater pipeline as they advanced. Initially, the British Commander in Egypt, Sir Archibald Murray, intended to proceed slowly, but after a meeting between the British and French, it was decided to advance on multiple fronts; Maude's advance on Baghdad was one; Murray was ordered to move on Gaza, while other advances were launched on the Western and Macedonian Fronts. The February Revolution in Russia had undercut the Eastern Front. By March, the rail line had reached Khan Yunis, and the Turks were entrenched south of Gaza.

Murray (Seven Pillars)
By advancing along the coast to Gaza, the British avoided the main Ottoman concentration around Beersheba (where the Turkish railway ran) and allowed for naval resupply. The plan was to seek to capture the Gaza garrison by a single stroke, using the mounted to envelop the town and screen against Turkish reinforcements.

Dobell
Murray entrusted command of the operation to the Commander of his Eastern Force, Sir Charles Dobell, a Canadian. Dobell in turn entrusted the main effort to the highly mobile Desert Column, consisting of the ANZAC Mounted Division, the Imperial Mounted Division, the Imperial Camel Corps, and the 53rd Welsh Division.

The plan was to advance the rail line to the Wadi Ghazzeh, which cuts as a deep ravine a few miles south of Gaza. A network of ravines around the wadi made the land difficult to pass and the open, barren country south of the town gave a lack of cover and a clear field of fire to the Turkish defenders in their trenches. (See the map at bottom.)

Chetwode
The Desert Column was commanded by General Sir Philip Chetwode.

The defending forces were under the command of General Friedrich Kress von Kressenstein, the German Chief of Staff to Turkish Fourth Army Commander Djemal (Cemal) Pasha.

Kress von Kressenstein
As already noted, the main German concentrations were around Beersheba. In the advance on Gaza, Dobell estimated there were only 2,000 defenders in Gaza; the British had a total force of 22,000. In fact there were already 4,000 defenders, with reinforcements on the way.

In the open, arid country, both sides were able to use aircraft to good effect; the British made bombing raids on Beersheba and a rail junction through February and March, and both sides flew reconnaissance missions.
Bombing raid on Gaza..

The British appear, in retrospect, to have underestimated not just the Turkish numbers but also their morale. Unlike the advance across Sinai, Gaza was clearly Ottoman territory, and in both the First and Second Battles of Gaza, the British would fail, at least in part due to a precipitate retreat.

More to come.


Friday, March 10, 2017

March 10-11, 1917: General MaudeTakes Baghdad

Following the Second Battle of Kut, in February, the renewed British advance on Baghdad paused
Maude
only briefly. General Frederick Maude (who had been the last man off the beach at Gallipoli), continuing to show far more speed than his predecessors, advanced to ‘Aziziyya, paused there, and on March 5 began his final approach to Baghdad.

The British had been uncertain about the value of taking Baghdad due to its limited strategic value but eventually saw it as a symbolic goal; in addition it was seen as a way to close a pincer on the Turks with British advances from Baghdad and Russia pushing south from Mosul. That was not to be: at this same moment the February (March New Style) Revolution was under way in Petrograd.

Khalil Pasha
The defense of Baghdad was commanded by the hero of the 1916 victory at Kut, Khalil Pasha, who was the uncle of Ottoman Minister of War Enver Pasha and was both governor of Baghdad and Commander of the Ottoman Sixth Army. After the war he would take the surname Kut from his victory and be known under the Turkish Republic as Halil Kut. He had the Turkish XIII and XVIII Corps defending the Baghdad region.

Maude marched his main force up the east bank of the Tigris, arriving March 8 at the banks of its big tributary the Diyala. With the Turks defending the opposite banks of the Diyala, Maude moved most of his force downstream and crossed to the west bank of the Tigris. Detecting the movement (both sides had aircraft now with Germans flying for the Turks), Khalil moved most of his force to the west bank, leaving one regiment on the Diyala. The British soon pushed this aside, and Khalil, facing British advances on both banks, resolved on a retreat from Baghdad. By the evening of March 10, the Ottoman evacuation of Baghdad was under way, with no major battle having been fought.

On the next day, March 11, the British and Indian forces entered Baghdad. The northward advance would be put on hold after Baghdad as the war unfolded on other fronts. Photo of Maude entering Baghdad on March 11, 1917:

Thursday, February 23, 2017

Second Act in Mesopotamia: the Second Battle of Kut, February 23-24, 1917

We stopped following the centennial of the British Mesopotamian campaign in World War I after General Townshend's disastrous surrender of British and Indian troops at Kut in April 1916. The twin shocks of Gallipoli and Kut stalled British efforts in the Middle East for much of the rest of 1916, despite a successful advance across Sinai.

Maude
After Kut, the British had to reorganize the forces in Mesopotamia, and the new commander, Lt. Gen. Sir Frederick Stanley Maude, who in January had been the last man off the beach at Gallipoli, was ordered to consolidate in the south rather than resume the advance on Baghdad.

Baratov (on right)
In fact the Chief of the Imperial General Staff (CIGS), General Sir William Robertson, considered that Baghdad was not a major strategic prize. But as 1916 wore on, the British felt that Russian successes in the Caucasus and northwestern Iran under Gen Nikolai Baratov justified resuming an offensive toward Baghdad, squeezing the Turks between the British and the Russians and isolating Iran from German influence..  (In 1916, of course, no one foresaw the Russian collapse into revolution the next year.)

Kazem Karabekir Bey
By September 1916, British policy began to shift to a new advance on Baghdad, and in December Maude launched his advance up the Tigris. Advancing initially on both banks, supported by riverine forces, he was able to defeat or brush aside small Ottoman garrisons throughout January. Winter rains and several fortified positions delayed the advance. The main Ottoman force opposing Maude were elements of the Ottoman XVIII Corps under Kazim Karabekir Bey, with some 17,000 troops around the town of Kut. were faced by 50,000 frontline troops under Maude. Requests for reinforcements sent to overall commander Khalil Pasha (Halil Kut) were to no avail. The mistakes of 1915 would not be repeated.
Situation at Kut, February 22, 1917 ("1915" is a typo)


The "Second Battle of Kut" was more a battle of maneuver than of combat. As Maude's superior force approached Kut, he crossed the Tigris at Shumran Bend on February 17, threatening the Turkish right, while the rest of the force moved on its left. Outflanked and outnumbered, and certainly mindful of Townshend's disaster after letting himself be besieged, Karabekir Bey chose to extract himself from his untenable position. By February 24, the Ottoman force was retreating up the river, ursued by Maude's riverboats.

The Second Battle of Kut in some small measure may have offset the shock of the surrender, but it also marked the arrival of a much more competent commander, Less than three weeks later, Maude would enter Baghdad.

Wednesday, January 11, 2017

The Battle of Rafah, January 9, 1917: Last Ottomans Pushed Out of Sinai, Part I

 Journal deadlines and other news have delayed this post, which really should have appeared two days ago. Last summer we traced the Ottoman Army's second advance toward the Suez Canal, and its ultimate repulse at the Battle of Romani in August of 1916.

Extending the railway across Sinai
During the remainder of the year, the British Empire Forces (mostly ANZACs). The advance was slowed by the need to build the railroad line and a pipeline for water forward as they moved. Finally, in two actions in eastern Sinai in December 1916 and January 1917, the last Ottoman troops were pushed out of Egyptian territory. With the Battle of Rafah a century ago Monday, British war historians mark the end of the Sinai Campaign.

The Main Allied force was rhe ANZAC Mounted Division, consisting of the 1st, 2nd, and 3rd Australian Light Horse Brigades and a New Zealand Mounted Rifle Division. From December 1916 these forces were assigned to the Desert Column, formed to support operations in Sinai and Palestine.

Turkish base at Hafr al-‘Auja
On December 20, 1916, the Allied force reached El ‘Arish, where they discovered the Ottoman force had evacuated the town and withdrawn up the Wadi El ‘Arish to the vicinity of Magdhaba to the southeast. (See map above. Illustrations are from Wikimedia.) Unwilling to advance beyond El rish while leaving Turkish and German forces behind their right in a fortified position at Magdhaba (not far from the big Turkish support base at Hafr al-‘Auja, just inside the Palestinian side of the border).

The Commander of the Desert Column, Sir Phillip Chetwode, arrived at El ‘Arish with supplies from Port Said, and prepared to dispatch the ANZACs under Sir Harry Chauvel. The German Commander of the Ottoman Desert Force, Kress von Kressenstein, had constructed a series of fortified redoubts at Magdhaba which he thought could resist attack, but he reckoned without the high mobility of the Light Horsemen.

The ANZACS, under Sir Harry Chauvel, advanced on the night of December 22-23,  and in a fierce battle on the 23rd succeeded after a day's hard fighting, forced an Ottoman surrender. The fight at Magdhaba had set the stage for the Battle at Rafah, the last act in Sinai.


Tuesday, January 3, 2017

January 4, 1917: Russian Battleship Peresvet is Sunk Off Port Said

Imperial Russian Navy Bttleship Persevet in 1901
This year I will continue my practice of recounting major events in World War I on the centenary of the event. Since 1917 was a key turning point in the Middle East, with major developments in the Palestine and Mesopotamian campaigns and the Arab Revolt, and, before he year was out, the emergence of General Allenby, the end of the Senussi campaign, and, before the year's end, the Balfour Declaration and the publication of Sykes-Picot by the Bolsheviks. In this month of January alone, there were the Battle Of Rafah in Sinai, the recapture of Kut in Mesopotamia by the British, the taking of the port of Wejh in Arabia by the Arab Revolt, and the promotion of Reginald Wingate from Sirdar to Governor-General in Egypt. And that's just January.

My post today is not as important as any of those things. Only four days into the New Year, the Imperial Russian Navy Battleship Peresvet (also transliterated Peresvyet, Peresv'et: Пересвет) was sunk by a mine several miles off Egypt's Port Said.

Now, several Russian warships were in the Mediterranean when the Turks closed the Straits late in 1914, and they joined with the British and French Mediterranean Squadrons, but Peresvet was not one of them. In fact, what it was doing off Port Said is a rather bizarre tale in its own right. She was headed to the Russian White Sea Fleet in the far north, from Asian waters.

Sagami (rear) in Japanese service
Launched in 1898, Peresvet saw action in the Russo-Japanese War. She fought at Port Arthur and in the Battle of the Yellow Sea, as well as the Siege of Port Arthur. When the Russians surrendered at Port Arthur, they scuttled her. Subsequently the Japanese raised her, rearmed her, renamed her Sagami, and used her as a coastal defense ship.

In World War I, Japan and Russia suddenly found themselves on the same side in the war, and in 1916, Japan sold her (back) to Russia. In April 1916, in Vladivostok, she resumed her previous name and was reclassified as an armored cruiser. She then ran aground and had to be refloated. She was assigned to Russia's White Sea Fleet,  She reached Port Said, and put in for repairs. Ten nautical miles off Port Said on January 4, 1917, she hit two mines and sank, with total losses somewhere between 116 and 167. The mines had been laid by the German submarine U-73.


Wednesday, December 7, 2016

Changing Horses a Century Ago: Lloyd George Becomes Prime Minister

David Lloyd George
This particular 100th anniversary post notes an event which, while not directly related to the Middle East, would have enormous effects on the Middle East in the remaining two years of the First World War. On December 7, 1916, David Lloyd George replaced Herbert Asquith as Prime Minister of the United Kingdom. Internal Liberal Party politics, which I need not go into here, propelled Asquith to step down.
s
Lloyd George, a proud Welshman and veteran Liberal politician, had been serving as Minister of Munitions until June, when Lord Kitchener went down with HMS Hampshire in the North Sea. and Lloyd George took over as Secretary of State for War.

Even before becoming Prime Minister, Lloyd George became a strong advocate for emphasizing the Eastern Theaters of the war, particularly Palestine, Greece, and the Balkans, and as Prime Minister continued this focus, echoing his younger (then still) Liberal Party colleague Winston Churchill. Though he never got War Cabinet approval to shift troops from the Western Front, he did preside over more aggressive efforts in Palestine and the Balkan Front.

The 1917 Overture (Punch cartoon)
An avid reader of the Bible who said he preferred the Old Testament over the New, he had a fascination with Biblical geography. (During the Paris Peace negotiations he reportedly asked Clemenceau to cede to Britain the Mandate over "Palestine from Dan to Beersheba," though the Biblical definition was less than the eventual Mandate.) Though the Balfour Declaration of 1917 bears the name of the Foreign Secretary, Alfred James Balfour, Lloyd George was at least its godfather. And in the 1919 peacemaking, Lloyd George was deeply involved in bringing Palestine and Mosul into Britain's sphere.

Herbert Asquith had been easily dominated by his Cabinet colleagues, with stronger men like Kitchener at the War Office and Churchill at the Admiralty (until Gallipoli). Lloyd George would be a very different sort of leader.

Thursday, September 22, 2016

September 22, 1916: The Ta'if Garrison Surrenders to the Arab Revolt

Sharifian Troops in Ta'if after the Surrender
Back in June, in discussing the centenary of the outbreak of the Arab Revolt, I noted that after the Revolt was proclaimed by Sharif Hussein at Mecca, the Sharifian forces soon occupied Mecca and, with British assistance, Jidda was also taken. Hussein's sons ‘Ali and Feisal attacked Medina and ‘Abdullah attacked Ta'if, the mountain resort town near Mecca.

The Sharifians were repulsed from Medina, where the Turks had a garrison of 10,000 and which, as railhead of the Hejaz Railway could easily be resupplied.
Ta'if in 1917 (H. St.John B. Philby)


‘Abdullah
At Ta'if, ‘Abdullah's troops quickly occupied the outskirts, while the Turkish garrison retreated into its garrison and the town fortifications. Lacking artillery, ‘Abdullah's forces decided on a siege rather than a full attack.

Meanwhile the British began transporting artillery through mountain roads to Ta'if. The artillery would be manned by Egyptian gunners, despite Egypt remaining nominally neutral. Sharifian sympathizers reportedly provided artillery spotters.

Ali Galip Pasinler
The siege eventually dragged on for three months, from June 10 to September 22.The Ottoman garrison was under Gen. Ali Galip Bey (later known as Ali Galip Pasinler). Finally, on September 22, Galip surrendered with his whole garrison. He had moved his headquarters several times after his original bunker was hit by artillery.

‘Abdullah remembered his conversation with Galip thus in his Memoirs:
 I found him in the large hall at Shubra Palace, the only general among seventy-five junior officers.
He seemed pleased to see me, and after several moments he said, “This is a great catastrophe . . . we were brothers and now we are enemies” I felt bolder in his presence now that our positions were reversed, but said as gently as I could, “The master has become the master again and is freed from slavery and the yoke of him whom he enlightened.”
His face became as white as a sheet, but he recovered himself and said, “I know that the Arab nation would separate from us one day, but I never thought that it would happen so quickly.” “You are right, “ I replied, “for speed was in our interest. If you had retained the absolute authority of the Caliphate, we would never have risen against you, but your party became despotic and dictated not only to your people but to the Sultan as well . . . However, recriminations now will do no good. Please come in to dinner. I hope you will enjoy that I have prepared for you after the rigors of the siege”
Ruins of Sharif Hussein's Palace in Ta'if after the siege (Philby)
Below is a postwar Turkish  map showing the siege of Ta'if:


Thursday, August 4, 2016

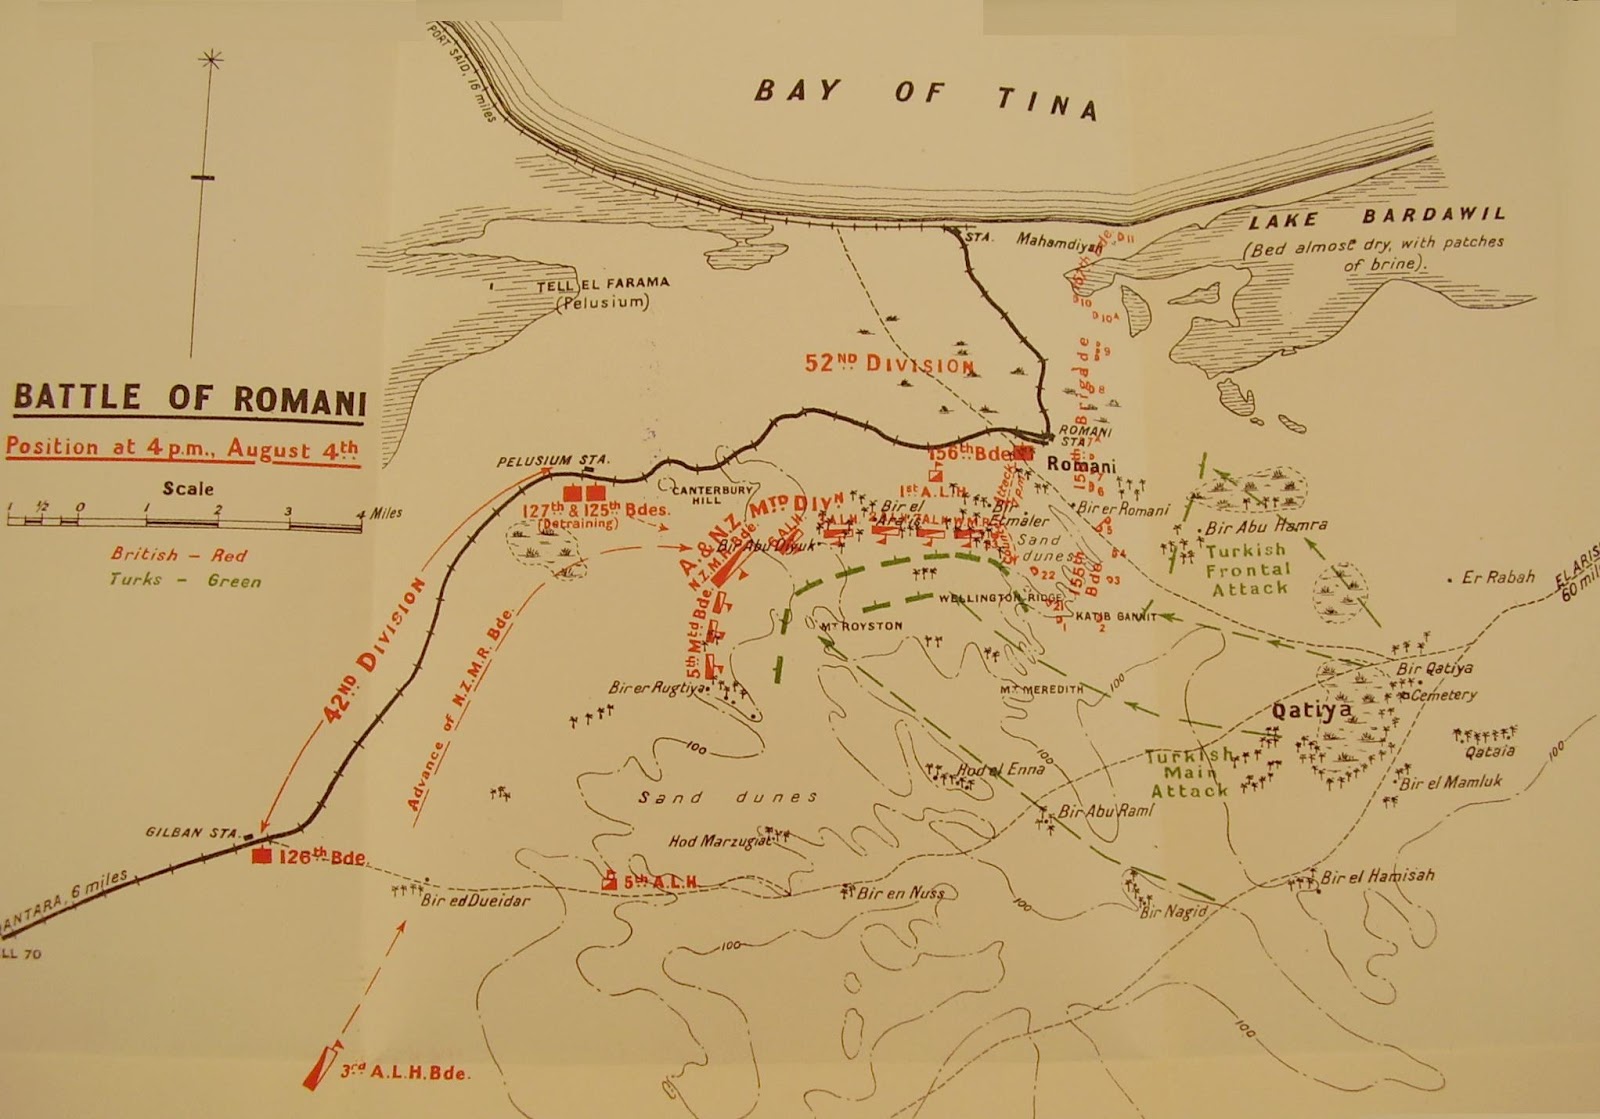
The Battle of Romani, August 4-5, 1916: Part II

In yesterday's Part I, we discussed the forces engaged and the initial deployments before the Battle of Romani in the Sinai a century ago. The advancing Ottoman and German force had been closely tracked by the British in their trek across Sinai, thanks to the new tool of aerial reconnaissance. the  The Turkish force had an extended logistical line, while the British fortifications were at the railhead of the line they were building across Sinai, and could be quickly rushed reinforcements from Qantara on the Canal. They had had the time to fortify the defensive position at Romani. While the Turco-German force slightly outnumbered the British Imperial forces (mostly ANZACs), they faced the challenges of being on the offense and far from potential reinforcements. Both the head of the German Military Mission, Liman von Sanders, and the local German commander on the scene, Kress von Kressenstein, complained about the decision to advance against the well-entrenched British forces.
As the British lines were anchored on the left by the sea, the Turkish attack was aimed at turning the right of the lines, in the desert. The hope was to drive in the flank and attack the rail line.

This was exactly what Harry Chauvel expected. Initially his main force consisted of the 1st Australian Light Horse Brigade; the 2nd Brigade was scattered in outposts and on patrol.

At around midnight on August 3/4. the Turkish advance force suddenly encountered the Light Horse on the right of the line. Fire was exchanged, and the Turks fell back to regroup. They began an organized attack around 1 AM. Through the night the Turks advanced, and the 1st Light Horse was forced to steadily fall back to a sand ridge they called Wellington Ridge. Various dunes and sandhills had been given names (Mount Meredith, Mount Royston) which appear in the battle narratives.

With first light around 4:00, it became clear that the 1st Light Horse was in a tenuous position, with its right being outflanked. At 4:30 Chauvel ordered two regiments of the 2nd Light Horse into the line to the right of the 1st, extending the flank. He also moved troops from the left of the line to extend his right, replacing them with troops of the 52nd (Lowland) Division, a British Territorial (or Yeomanry) unit intended got home defense. The Ottoman 32nd and 39th Regiments continued to try to outflank the Australian right, while the 31st Infantry pushed forward against the Territorials. As the morning wore on, the Light Horse were forced to fall back until they threatened to reach the ANZAC camps. But the horse artillery of the Light Horse stopped their advance. The Australians were reinforced by the New Zealand Mounted Rifles Brigade and the 5th Mounted Yeomanry, with the 42nd (Lancashire) Division of Territorial troops arriving by train.

As the day wore on and the Anglo-ANZAC line was reinforced, the Turkish and Germans, who had no reinforcements available or convenient railroad, and ho had marched all night and fought all day in August in the Sinai with little water, found their advance blocked and many began to surrender. By evening, the reinforced ANZACs and British counterattacked against enemy positions on the sandhill they had named Mount Royston.

As darkness fell, the battle had clearly shifted to the British side, By the next day, the reinforced British and ANZAC force would swell to some 50,000, vastly outnumbering their adversaries.

Tomorrow: Pursuit.

Wednesday, August 3, 2016

The Battle of Romani, August 4-5, 1916, Part I

On July 19 we discussed the Turkish advance into Sinai a century ago. This week marks the centenary of the Battle of Romani, a small but key turning point in the Middle Eastern campaign in World War I: Britain's first victory against the Ottomans after the retreat from Gallipoli and the surrender at Kut. It has also conventionally been seen as the transition between the Defense of the Suez Canal and the beginning of the Palestine Campaign.

Kress von Kressensten
The July post described the beginning of the Turkish advance, largely tracked by aircraft. The advancing column of Turkish and allied forces consisted of the Ottoman 3rd Infantry Division (31st, 32nd and 39th Regiments), veterans of Gallipoli, plus the German "Pasha" Force, including a German aircraft detachment, German light and heavy artillery and mortar, and one Austrian artillery unit. The German Forces were under the command of Freiherr Friederich Kress von Kressenstein, the German Chief of Staff to Jemal Pasha's Fourth Army. As they had advanced toward the British lines, they had established a series of defensive lines in case of falling back.

The British were under the overall command of Egyptian Expeditionary Force Commander General Sir Archibald Murray, at Cairo, and under him the commander of the northern (Number 3) Sector of Canal Defenses, General Herbert A. Lawrence, headquartered at Qantara.

But the man at the front, in the forward defense lines, was Maj. Gen. Harry Chauvel, an Australian commanding the ANZAC Mounted Division, consisting of the 1st and 2nd Brigades of Australian Light Horse with the British Territorial 52nd (Lowland) Division, and soon reinforced by the New Zealand Mounted Rifles Brigade and other units.

A Young Harry Chauvel
Any readers from Down Under will need no introduction to the Light Horsemen, or to Harry Chauvel. Already bloodied at Gallipoli, where they had fought without their mounts, the Light Horse would ride into fame in the Palestine Campaign, from Beersheba to the victory at Megiddo and the capture of Damascus.
Chauvel After the War
Harry Chauvel would go on to become the first Australian to command a Corps and was later Chief of General Staff.

Kress von Kressenstein might be the Prussian professional soldier,  with a name to match, but a horse soldier from New South Wales was going to be master of the coming battle.

The British front line was at Romani, to which the British had built a rail line, and which lay near the ruins of ancient Pelusium.

By the battle, British and ANZAC forces would number some 14,000, Ottoman/German/Austrian some 17,000.

The British were entrenched with their left on the Mediterranean and the Bardawil lagoon, the main force on a ridge they called Wellington Ridge, and built a line of fortifications along sand hills to a large dune called Katib Gannit.

The action would begin the night of August 3, and develop on August 4 and 5. We'll pick up the story tomorrow.

Light Horse Encampment at Romani